Chapter 6
2.4GHz Radio Communication
สื่อสารผ่านคลื่นวิทยุ
- Both micro:bit V1 and V2 can talk to each other with 2.4 GHz radio (คลื่นวิทยุ 2.4GHz).
- You use the blocks in the Radio group.
- No Wi-Fi, no internet and no router are needed.
Radio Fundamentals & Block Taxonomy บล็อกคำสั่งในกลุ่ม Radio
- Boards talk by sending small packets through the air.
- First choose a channel (a group), then learn the Radio blocks.
Radio groups: your private channel กลุ่มช่องสัญญาณ 0–255
radio set grouppicks a channel from 0 to 255.- Sender and receiver must use the same group.
- Boards in a different group simply do not hear the packet.
💡 Remember
- Use a group number nobody else in the room uses, or you will hear their messages.
- Call
radio set groupinon start, before anything is sent.
Transmit power: how far the packet goes
radio set transmit powertakes a level from 0 to 7.- Higher level = longer range (about 70 m in the open at level 7).
- The default is level 6 if you never set it.
The Radio blocks ชุดคำสั่งในกลุ่ม Radio
| MakeCode Block | Description |
|---|---|
radio set group [1] |
|
radio send number [0] | Broadcasts one number (whole or decimal). |
on radio received [receivedNumber] | Runs when a number arrives. The number is stored in receivedNumber. |
radio send value ["name"] = [0] | Broadcasts a name (text) and a number together, e.g. "A" = 1. |
on radio received [name] [value] | Runs when a name and value arrive, stored in name and value. |
radio send string ["Hello"] | Broadcasts a piece of text. |
on radio received [receivedString] | Runs when text arrives. The text is stored in receivedString. |
radio set transmit power [7] |
|
6.1 Signal Strength (RSSI) Display แสดงระดับความแรงสัญญาณบน LED 5x5 จุด
- This is the simplest radio test: both boards show how strong the other board's signal is.
- RSSI means "received signal strength", measured in dBm.
Step-by-Step Exercise
- Step 1 — Set the group: put
radio set groupinon startand set it to 1. - Step 2 — Transmit: put
radio send number 0inforever. - Step 3 — Add a delay: add
pause (ms) 500under it, so a packet goes out every half second. - Step 4 — Receive: drag out
on radio received [receivedNumber]. - Step 5 — Show a number: put
show numberinside it. - Step 6 — Use the signal: drop
received packet signal strengthintoshow number.
Testing the signal meter: download the code to both boards, then move them closer and farther apart.
- Touching: the number is the highest, around -42 dBm.
- Across the room: the number gets more negative, around -80 to -95 dBm.
💻 6.1 Signal strength meter — both boards run this same program
See it in JavaScript
radio.setGroup(1)
basic.forever(function () {
	radio.sendNumber(0)
	basic.pause(500)
})
radio.onReceivedNumber(function (receivedNumber) {
	basic.showNumber(radio.receivedPacket(RadioPacketProperty.SignalStrength))
})6.2 Two-Way Messaging Between Boards ส่งข้อความระหว่างบอร์ด
- Example 6.1 sent signal strength. Now we send real text.
- Each board waits for text from any board in the same group.
Step-by-Step Exercise
- Step 1 — Set the group: put
radio set groupinon startand set it to 1. - Step 2 — Button A sends "Hello": drag
on button A pressedfromInput, then putradio send stringinside and type "Hello". - Step 3 — Button B sends "Goodbye": repeat step 2, but choose button B and type "Goodbye".
- Step 4 — Receive text: take
on radio received [receivedString]fromRadio, and putshow stringfromBasicinside it. - Step 5 — Show the text: drag receivedString into
show string.
Testing the two-way pager:
- Download the code to both boards.
- Press A or B on one board: the message scrolls on the other board.
- Press A or B on the other board: the message scrolls back on the first one.
💻 6.2 Two-way pager — A sends "Hello", B sends "Goodbye"
See it in JavaScript
radio.setGroup(1)
input.onButtonPressed(Button.A, function () {
	radio.sendString("Hello")
})
input.onButtonPressed(Button.B, function () {
	radio.sendString("Goodbye")
})
radio.onReceivedString(function (receivedString) {
	basic.showString(receivedString)
})6.3 Proximity Friend Finder ค้นหาเพื่อนด้วยความแรงสัญญาณ
- A packet carries more than the number or text you send.
- The receiver can also read these extras:
- Serial Number: a number unique to each micro:bit.
- Time: in microseconds, counted from when the sender started.
- Signal strength: -128 to -42 dBm, and -42 is the strongest.
How the Geiger-Counter Effect Works
- Each board sends
x = 5every 0.1 s. The value itself does not matter. - The receiver's
on radio receivedruns and storessignal strengthin the variable signal. - In
forever,mapturns the signal into a number from 1 to 15, androundmakes it a whole number. - That number sets how long each beep (and each rest) lasts.
- Weak signal: long beeps, far apart. Strong signal: short beeps, close together. It sounds like you are closing in on the target.
1. Transmitter Code โค้ดของตัวส่ง
💻 6.3 The hidden board (transmitter) — it calls out ten times a second
See it in JavaScript
radio.setGroup(81)
basic.forever(function () {
	radio.sendValue("x", 5)
	basic.pause(100)
})
2. Receiver Code โค้ดของตัวรับ
💻 6.3 The finder (receiver) — the beeps get faster as you close in
See it in JavaScript
let signal = 0
let item = 0
radio.setGroup(81)
radio.onReceivedValue(function (name, value) {
	signal = radio.receivedPacket(RadioPacketProperty.SignalStrength)
	basic.pause(200)
})
basic.forever(function () {
	item = Math.round(Math.map(signal, -100, -40, 15, 1))
	music.playTone(Note.A5, item * 20)
	music.rest(item * 20)
})
📘 Book correction: the first second
- Before the first packet arrives,
signalis still 0, which is outside the −100 … −40 range. mapthen gives a negative beep length, so the very first beeps are wrong.- Fix: add
set signal to -100inon start, so the finder starts at "far away" (slow beeps).
6.4 Classroom Voting & Scoring System สร้างระบบให้คะแนน
- You need 5 micro:bits: 4 transmitters (the judges' clickers) and 1 receiver (the scoreboard).
- Each judge can only vote yes or no.
- The scoreboard shows the four votes on its 5×5 LEDs.
Transmitters Code (#1, #2, #3, #4)
- Transmitters use radio send value: a name plus a number, so the scoreboard knows which board sent it.
- The names are A, B, C, D.
- Press A: sends
1and showsshow icon (Yes). - Press B: sends
0and showsshow icon (No).
Transmitter #1 (judge 1)
on start:
    radio set group 81

on button A pressed:
    radio send value "A" = 1
    show icon (Yes)

on button B pressed:
    radio send value "A" = 0
    show icon (No)
Transmitter #2 (judge 2)
on start:
    radio set group 81

on button A pressed:
    radio send value "B" = 1
    show icon (Yes)

on button B pressed:
    radio send value "B" = 0
    show icon (No)
Transmitter #3 (judge 3)
on start:
    radio set group 81

on button A pressed:
    radio send value "C" = 1
    show icon (Yes)

on button B pressed:
    radio send value "C" = 0
    show icon (No)
Transmitter #4 (judge 4)
on start:
    radio set group 81

on button A pressed:
    radio send value "D" = 1
    show icon (Yes)

on button B pressed:
    radio send value "D" = 0
    show icon (No)
Try judge 1’s clicker
💻 6.4 Judge 1’s clicker — A votes yes, B votes no
See it in JavaScript
radio.setGroup(81)
input.onButtonPressed(Button.A, function () {
	radio.sendValue("A", 1)
	basic.showIcon(IconNames.Yes)
})
input.onButtonPressed(Button.B, function () {
	radio.sendValue("A", 0)
	basic.showIcon(IconNames.No)
})
Scoreboard Receiver Code โค้ดของตัวรับและแสดงผล
- The receiver uses
ifto check the name first. - Then it checks whether the value is 0 or 1.
- Value 1: switch that judge's LED on. Value 0: switch it off.
💻 6.4 The scoreboard (receiver) — one LED per judge
See it in JavaScript
radio.setGroup(81)
radio.onReceivedValue(function (name, value) {
	if (name == "A") {
		if (value == 1) {
			led.plot(0, 0)
		} else {
			led.unplot(0, 0)
		}
	} else if (name == "B") {
		if (value == 1) {
			led.plot(1, 0)
		} else {
			led.unplot(1, 0)
		}
	} else if (name == "C") {
		if (value == 1) {
			led.plot(2, 0)
		} else {
			led.unplot(2, 0)
		}
	} else if (name == "D") {
		if (value == 1) {
			led.plot(3, 0)
		} else {
			led.unplot(3, 0)
		}
	}
})- Result on the scoreboard: the top row of the 5×5 LEDs (columns 0, 1, 2, 3 in row y = 0).
- A judge's LED lights when they press the approve button (1) and goes dark on reject (0).
- The teacher and audience see all four judges' decisions live.
Interactive Radio & RF Hardware Explorer
Hover over or tap any part of the 2.4 GHz radio subsystem on the real micro:bit V2 photograph below.
micro:bit V2 2.4 GHz Radio Subsystem
Interactive Map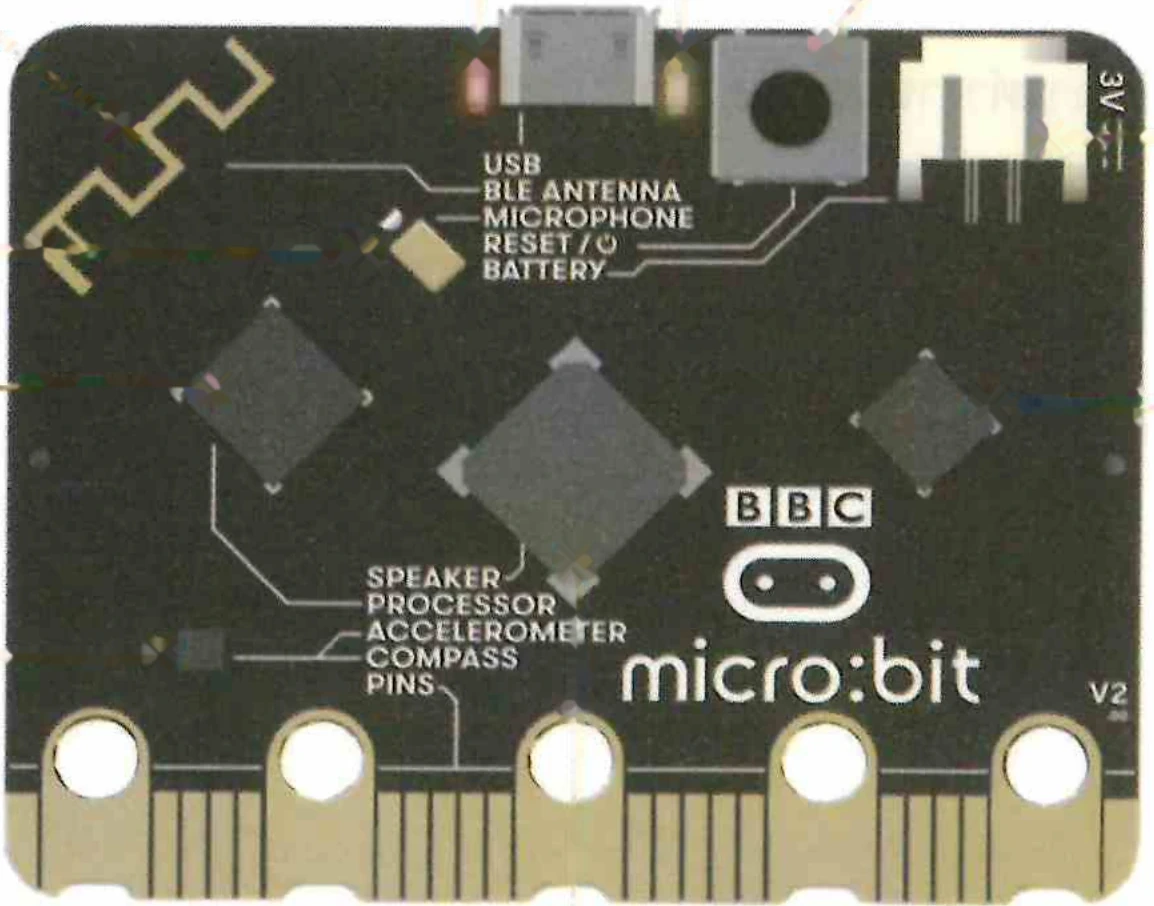
Hover or tap the 2.4 GHz PCB Antenna, nRF52833 SoC, or Speaker to inspect wireless communication hardware.
Chapter 6 Review & Self-Check
- Group 0–255: same number on both boards, or nothing is heard.
- Transmit power 0–7: higher goes farther. Default 6.
- RSSI: -128 (weak) to -42 (strong) dBm.
- Three packet types: number, value (name + number), string.
Test your understanding of radio groups, RSSI, the proximity formula and the voting system.