Chapter 3
Working with Switches and Touch Logo
การใช้งานสวิตช์ A B
- The micro:bit has two push buttons, A and B (ปุ่ม A และปุ่ม B).
- micro:bit V2 adds a touch-sensitive gold logo (จุดสัมผัสแบบคาปาซิตีฟ).
- Your code can react to the buttons and the logo, so the board answers you.
3.1 Button Event Coding โค้ดสำหรับกดปุ่ม A และ B
- Button A draws one running pose on the 5×5 display, and button B draws the other.
- Press them in turn and the stickman runs as fast as your fingers.
Step-by-Step Exercise: Manual Runner via Buttons
- Step 1 — Drag on button: pull an
on button [A] pressedblock from theInputcategory onto the workspace. - Step 2 — Draw frame 1: put
show ledsinside it and light the first running pose (first picture below). - Step 3 — Duplicate the whole block: right-click the
on buttonblock and choose Duplicate. Theshow ledsinside comes with it. - Step 4 — Edit frame 2: in the copy, redraw the LEDs as the second running pose (second picture).
- Step 5 — Switch it to button B: change the dropdown on the second block from
button Atobutton B.
Same two poses as text
Frame 1          Frame 2
. . # . .        . . # . .
. # # # .        . . # . .
. . # . .        . # # # .
. # . # .        . . # . .
# . . . #        . # . # .
💻 3.1 One pose per button — the runner you drive by hand
on button A pressed
show leds
on button B pressed
show leds
on button A+B pressed
clear screen
See it in JavaScript
input.onButtonPressed(Button.A, function () {
	basic.showLeds(`
		. . # . .
		. # # # .
		. . # . .
		. # . # .
		# . . . #
		`)
})
input.onButtonPressed(Button.B, function () {
	basic.showLeds(`
		. . # . .
		. . # . .
		. # # # .
		. . # . .
		. # . # .
		`)
})
input.onButtonPressed(Button.AB, function () {
	basic.clearScreen()
})- How it works: flash the code, then press A and B in turn.
- Each press paints its own pose, so the figure runs in time with your fingers.
Three Button Combinations in MakeCode
The on button [...] pressed block has three choices in its dropdown.
A: fires when the left button is pressed.B: fires when the right button is pressed.A+B: fires when both buttons are pressed together. MakeCode's simulator shows a virtual A+B button for it.
What is inside a button? สวิตช์กดติดปล่อยดับ
- Button A is wired to pin P5 and button B to pin P11.
- MakeCode hides the voltages: you only see the event, or
button A is pressed= true or false.
3.2 Conditionals & Repeat Loops สร้างเงื่อนไขกับปุ่ม A และ B
- Besides
on button, you can ask a question withbutton A is pressed. - The goal here: when A is pressed, play the running animation 4 times, then clear the screen and wait for A again.
Two ways to read a button
Step-by-Step Assembly of the 4-Cycle Loop Runner
- Step 1 — Drag if then: take
if thenfromLogicand drop it insideforever. - Step 2 — Add the question: put
button [A] is pressedfromInputinto theifslot. - Step 3 — Add the loop: drag
repeat [4] timesfromLoopsinsideif then. - Step 4 — Set the count: type 4 in the repeat block.
- Step 5 — Place the poses: put
show ledspose 1 and pose 2 inside the loop. - Step 6 — Insert pauses: put
pause (ms) 100after eachshow leds.
- This
ifhas noelse, so the No path just goes round again. - With
if … else, the No path would run its own blocks, for exampleclear screen.
Behavior Analysis
What the program does
- Press A: the two running poses alternate 4 times.
- After the loop it shows the Happy icon, waits, then runs
clear screen. - Then
foreverasks again: press A for another sprint. - Remove the Happy icon and pause if you want the screen cleared straight after the loop.
💻 3.2 Hold A to sprint — if … then with repeat 4 times
forever
if button A is pressed then
repeat 4 times
show leds
pause (ms) 100
show leds
pause (ms) 100
show icon
pause (ms) 1000
clear screen
See it in JavaScript
basic.forever(function () {
	if (input.buttonIsPressed(Button.A)) {
		for (let i = 0; i < 4; i++) {
			basic.showLeds(`
				. . # . .
				. # # # .
				. . # . .
				. # . # .
				# . . . #
				`)
			basic.pause(100)
			basic.showLeds(`
				. . # . .
				. . # . .
				. # # # .
				. . # . .
				. # . # .
				`)
			basic.pause(100)
		}
		basic.showIcon(IconNames.Happy)
		basic.pause(1000)
		basic.clearScreen()
	}
})
The same program as text
forever:
    if button A is pressed then:
        repeat 4 times:
            show leds:   (pose 1)
            pause (ms) 100
            show leds:   (pose 2)
            pause (ms) 100
        show icon (Happy)
        pause (ms) 1000
        clear screen
Counting presses with a variable
- A variable is a named box that remembers a number.
- A adds 1 to
countand shows it. B sets it back to 0 and shows a tick.
💻 3.2 Counting presses — a variable that remembers
on start
set count to 0
show number 0
on button A pressed
change count by 1
show number count
on button B pressed
set count to 0
show icon
See it in JavaScript
let count = 0
basic.showNumber(count)
input.onButtonPressed(Button.A, function () {
	count += 1
	basic.showNumber(count)
})
input.onButtonPressed(Button.B, function () {
	count = 0
	basic.showIcon(IconNames.Yes)
})3.3 The Capacitive Touch Logo ใช้งานจุดสัมผัส Logo เพื่อแสดงผล (เฉพาะ micro:bit V2)
- micro:bit V2 can sense a finger on its gold logo. This is capacitive touch (คาปาซิตีฟ).
- micro:bit V1 had no logo sensor. You had to touch pins P0, P1 or P2 while holding GND with the other hand.
- On V2 you touch only the logo: the sensor uses the small electric charge of your body, so no wire to GND is needed.
MakeCode Logo Event Options
The on logo [pressed] block in Input has four choices.
touched: runs the moment a finger lands on the gold logo.released: runs the moment the finger lifts off.pressed: runs for a quick tap on the logo.long pressed: runs when the finger stays on for at least 1 second.
Step-by-Step Project: Interactive Mood Face
- Step 1 — Place on logo: drag
on logofromInputonto the workspace. - Step 2 — Change to touched: switch its dropdown from
pressedtotouched. - Step 3 — Draw the neutral face: put
show ledsfromBasicinside and light the face below. - Step 4 — Duplicate: right-click the first block and choose Duplicate.
- Step 5 — Change to released: switch the copy from
touchedtoreleasedand redraw it as the smile.
- Testing the hardware: flash the code and touch the logo: the neutral face appears.
- Lift your finger: the smile appears straight away.
The full mood-face program
- The program below uses the preset icons Asleep, Happy and Sad.
- Each state is a face; each logo event moves the board to the next state.
💻 3.3 Mood face — the V2 touch logo, no wires needed
on start
show icon
on logo touched
show icon
on logo released
show icon
pause (ms) 500
show icon
See it in JavaScript
basic.showIcon(IconNames.Asleep)
input.onLogoEvent(TouchButtonEvent.Touched, function () {
	basic.showIcon(IconNames.Happy)
})
input.onLogoEvent(TouchButtonEvent.Released, function () {
	basic.showIcon(IconNames.Sad)
	basic.pause(500)
	basic.showIcon(IconNames.Asleep)
})Interactive Switches & Touch Explorer
Hover over or tap the buttons and the touch logo on the real micro:bit V2 photo to see how they work.
micro:bit V2 Inputs: Buttons A, B & Capacitive Touch Logo
Interactive Map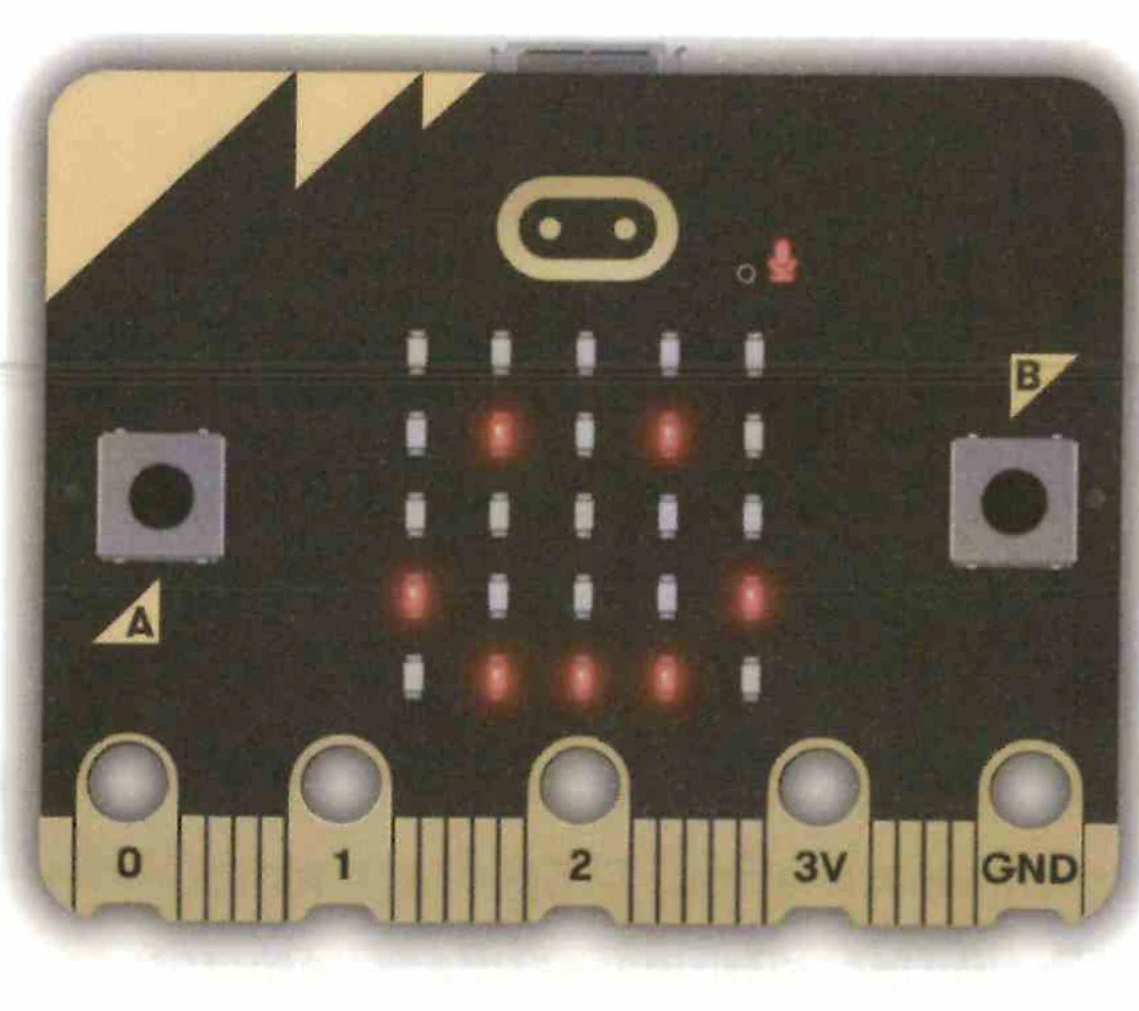
Hover or tap Button A, Button B, or the Touch Logo to explore how input events are processed.
Chapter 3 Review & Self-Check
Check what you know about button events, if and repeat, variables and the capacitive touch logo.